# Connect To Your Tags
In this section, we'll connect equipment state and count tags to the assets.
::embed-section{src="../../../kanoa-ops/assets/assetOEEInfo.md" collapsed="true" summary="Reference Materials: Configuring Tags - Learn how to connect your equipment to an asset."}
::::action[Import the CoreForge Simulator tags]
:::caution
The Kanoa MES module must be installed before you start. It provides the Kanoa/timer and Kanoa/assetInputs UDTs that the simulator tags use.
To check, look under UDT Definitions → Kanoa in the [Kanoa] provider and confirm timer and assetInputs are there.
:::
1. Download CoreForge Sim_UDTs_and_Tags.json
2. In the Designer, open the Tag Browser and select the [Kanoa] tag provider.
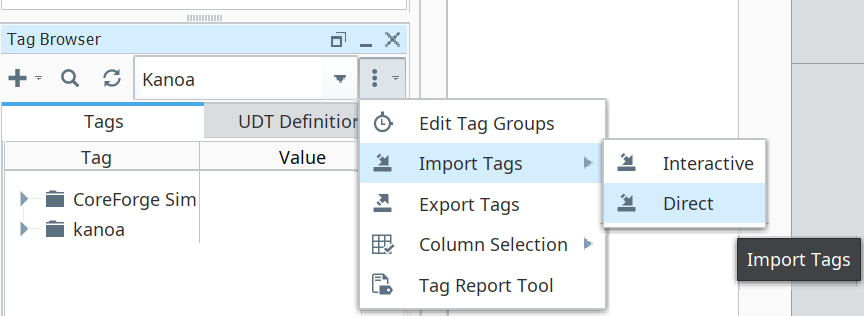
3. Select `Import Tags` by clicking on the three dots to the right of the Kanoa Tag provider and choose `CoreForge Sim (UDTs + Tags).json` using the Direct method. If asked, set Collision Policy to Overwrite, then click Import.
:::caution
Import from the top-level Tags folder of the [Kanoa] provider.
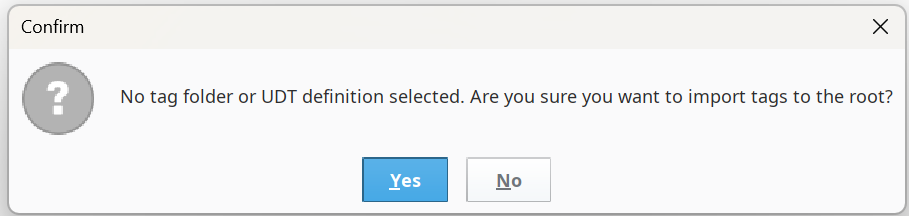 If you import into a subfolder, the simulator UDTs won't be created as UDT definitions, and every simulator tag will fail with "does not have item 'timer' for overrides".
If you see this error, the simulator UDTs weren't created in the right place. Delete any stray _types_ folder under Tags, then repeat the import from the top-level Tags folder with Overwrite. Your existing tags are repaired in place.
:::
4. Check the result:
- UDT Definitions → custom contains simState and simCounter.
- Tags → CoreForge Sim → Site contains the Machining, Mixing, Finishing and Coating assets.
- Expand any asset's sim/state. It should show timer, values and simParams with no error icon.
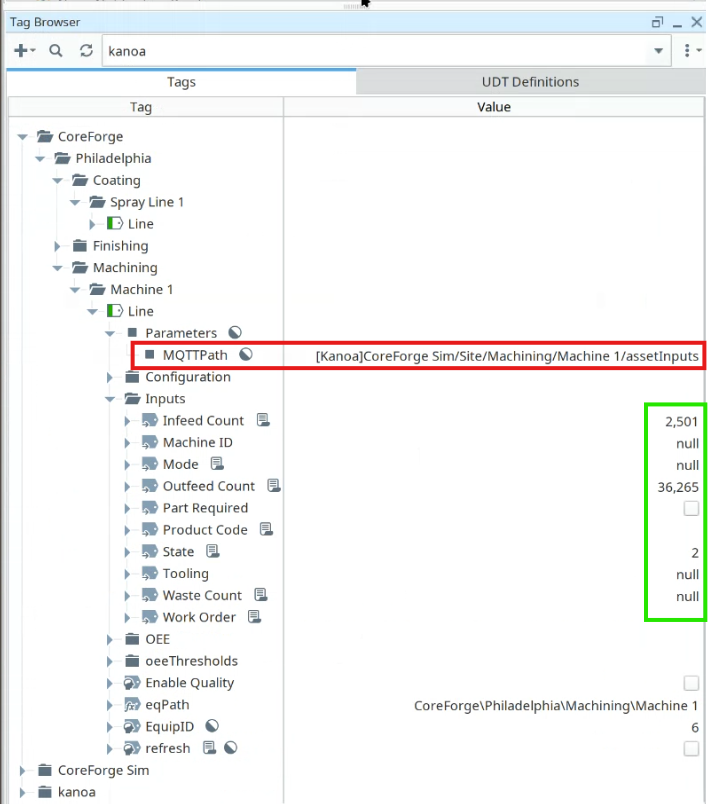
5. Expand the `CoreForge` tags (not the CoreForgeSim tags) and set the **MQTT path** parameter on each asset's line tag (assetOEE UDT instance) to the matching `CoreForgeSim` tag path:
| Line UDT | MQTT path value |
|---|---|
| Machine 1 | `[Kanoa]CoreForge Sim/Site/Machining/Machine 1/assetInputs` |
| Spray Line 1 | `[Kanoa]CoreForge Sim/Site/Coating/Spray Line 1/assetInputs` |
| Manual Pack 1 | `[Kanoa]CoreForge Sim/Site/Finishing/Manual Pack 1/assetInputs` |
Your setup should look like something below...
If you import into a subfolder, the simulator UDTs won't be created as UDT definitions, and every simulator tag will fail with "does not have item 'timer' for overrides".
If you see this error, the simulator UDTs weren't created in the right place. Delete any stray _types_ folder under Tags, then repeat the import from the top-level Tags folder with Overwrite. Your existing tags are repaired in place.
:::
4. Check the result:
- UDT Definitions → custom contains simState and simCounter.
- Tags → CoreForge Sim → Site contains the Machining, Mixing, Finishing and Coating assets.
- Expand any asset's sim/state. It should show timer, values and simParams with no error icon.
5. Expand the `CoreForge` tags (not the CoreForgeSim tags) and set the **MQTT path** parameter on each asset's line tag (assetOEE UDT instance) to the matching `CoreForgeSim` tag path:
| Line UDT | MQTT path value |
|---|---|
| Machine 1 | `[Kanoa]CoreForge Sim/Site/Machining/Machine 1/assetInputs` |
| Spray Line 1 | `[Kanoa]CoreForge Sim/Site/Coating/Spray Line 1/assetInputs` |
| Manual Pack 1 | `[Kanoa]CoreForge Sim/Site/Finishing/Manual Pack 1/assetInputs` |
Your setup should look like something below...
 ::::
:::info
For our training, we set the MQTTPath parameter of the line UDT instance and we can do this because our simulator tags are named identical to the tags in the Inputs folder i.e `Infeed Count', 'State'.
This allows us to set the path once. In reality, you'll be connecting to different named plc or mqtt tags for the source of counts and states, in which case you can simply change the reference of the Inputs tags for Infeed Count, Outfeed Count, Waste Count and State.
:::
:::check
Copy this script into the Ignition Designer Script Console (**Tools → Script Console**) and run it. It checks that both files were imported into the `Kanoa` provider, that the simulator tags are running, and that each line's assetOEE UDT has the right **MQTT path**. Each check prints PASS or FAIL with what to fix, plus a NOTE showing whether the line's inputs are reading the simulator. It doesn't change anything.
::::
:::info
For our training, we set the MQTTPath parameter of the line UDT instance and we can do this because our simulator tags are named identical to the tags in the Inputs folder i.e `Infeed Count', 'State'.
This allows us to set the path once. In reality, you'll be connecting to different named plc or mqtt tags for the source of counts and states, in which case you can simply change the reference of the Inputs tags for Infeed Count, Outfeed Count, Waste Count and State.
:::
:::check
Copy this script into the Ignition Designer Script Console (**Tools → Script Console**) and run it. It checks that both files were imported into the `Kanoa` provider, that the simulator tags are running, and that each line's assetOEE UDT has the right **MQTT path**. Each check prints PASS or FAIL with what to fix, plus a NOTE showing whether the line's inputs are reading the simulator. It doesn't change anything.
Show the check script
::check-script{src="ops/01-base-configuration/7-connect-tags.py" title="checkLesson-connectTags.py"}
:::