Check Sheets
Check Sheets are at the heart of the Kanoa Quality application and there is a lot to digest here so let's start off with what is a Check Sheet.
What Is A Check Sheet
A Check Sheet is a collection of all the checks you want to have performed at a certain time. Check Sheets contain Check Items where a Check Item is the
check to be performed. A Check Sheet can be associated to an asset, a group of assets or not be asset bound at all. Similarly, a Check Sheet can be associated
to an item (material, raw or finished good), a set of items or item classes or not be bound at all.
The Check Table is the entry point to viewing, creating and editing Check Sheets.
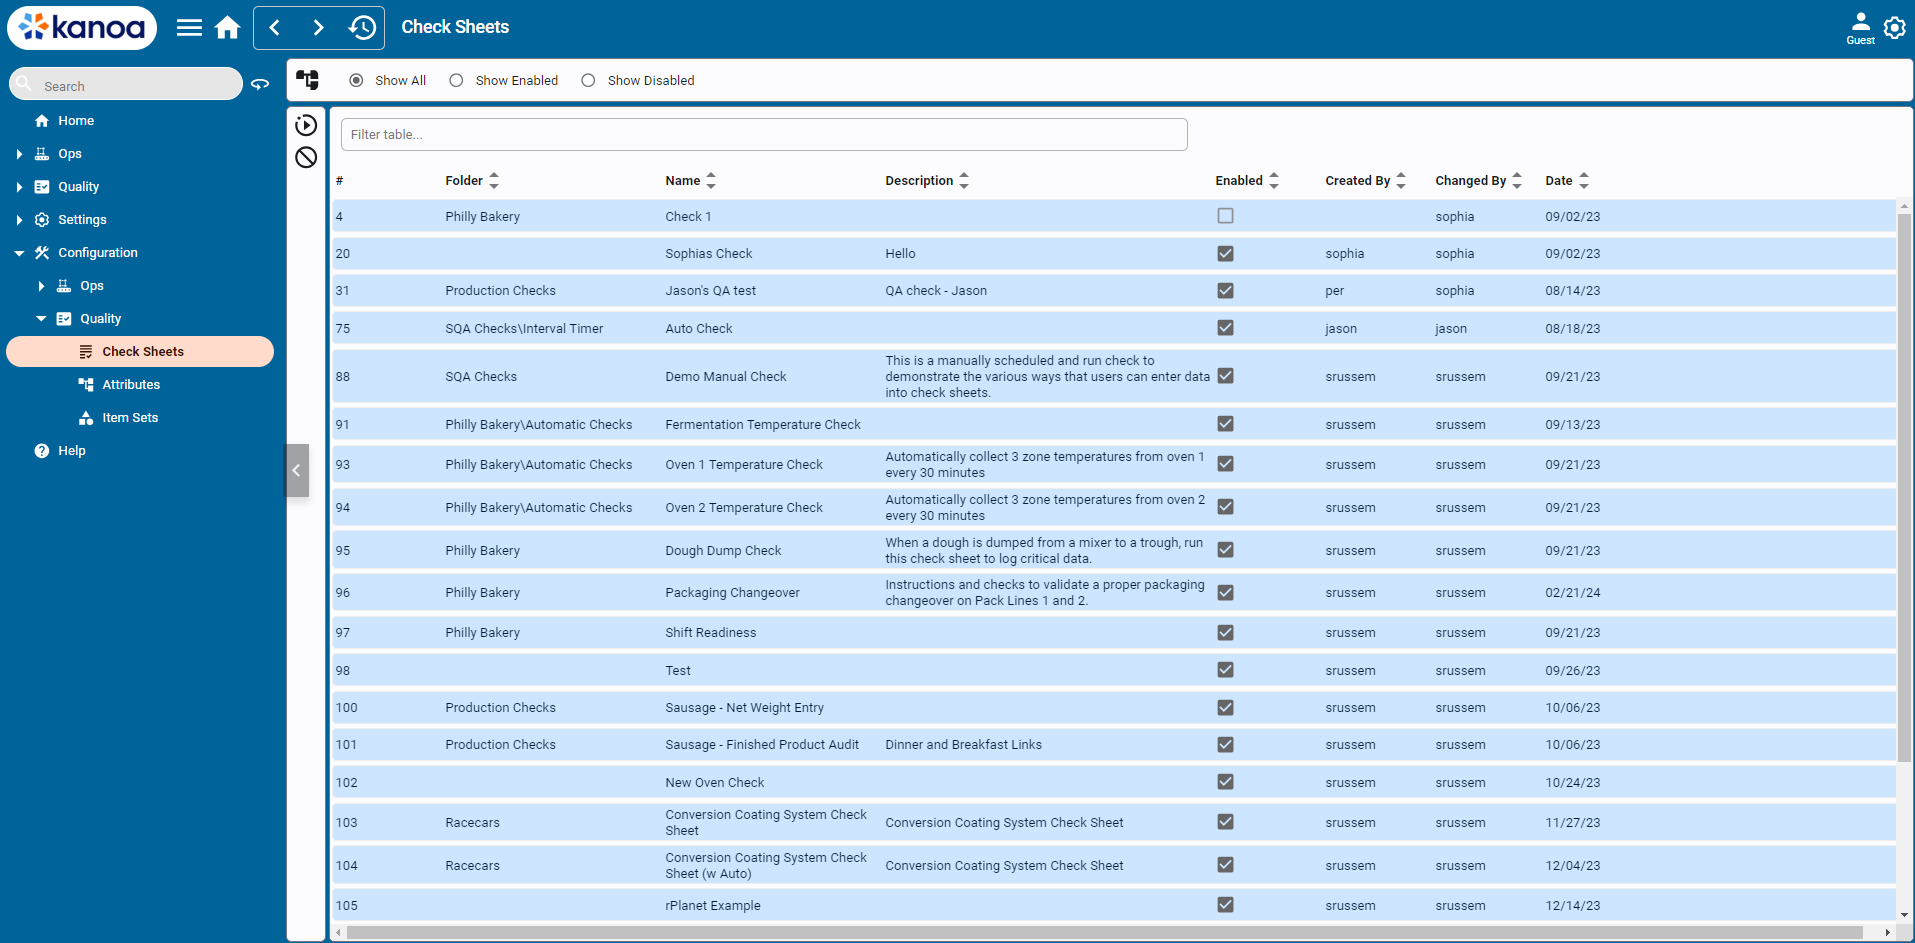
Editing Check Sheets
A Check Sheet can be viewed by selecting a check sheet in the table and double-clicking or using the ![]() button. Logged in users
with the appropriate permissions can create, edit, duplicate and delete checks sheets in this screen.
button. Logged in users
with the appropriate permissions can create, edit, duplicate and delete checks sheets in this screen.
The first order of business is to provide a name for this Check Sheet. Entering the name will automatically save this check sheet and all other configuration details will be stored against it. For the most part, any change or entry you make in the Check Sheet Editor is automatically saved as you go along. Where a save action is required, a save button will be displayed.
![]()
- View/Edit Mode:
 Switch between editing and viewing
 - Name: Name of the check sheet
- Estimated Minutes: Enter the expected duration of the test. This will create a check Item in the 'Main' Group'. Optional
Check Sheet configuration is divided into four different sections accessed by the tab.
Info
This section contains information about this Check Sheet. Here you can provide...
- Description: A description about the Check Sheet
- Procedure Name: A procedure name if this Check Sheet is to be linked to an existing procedure
- Instructions: Detailed instructions that will be presented to the person at the time of taking the checks
- Documents: Attach an SOP or document that details how the checks should be carried out

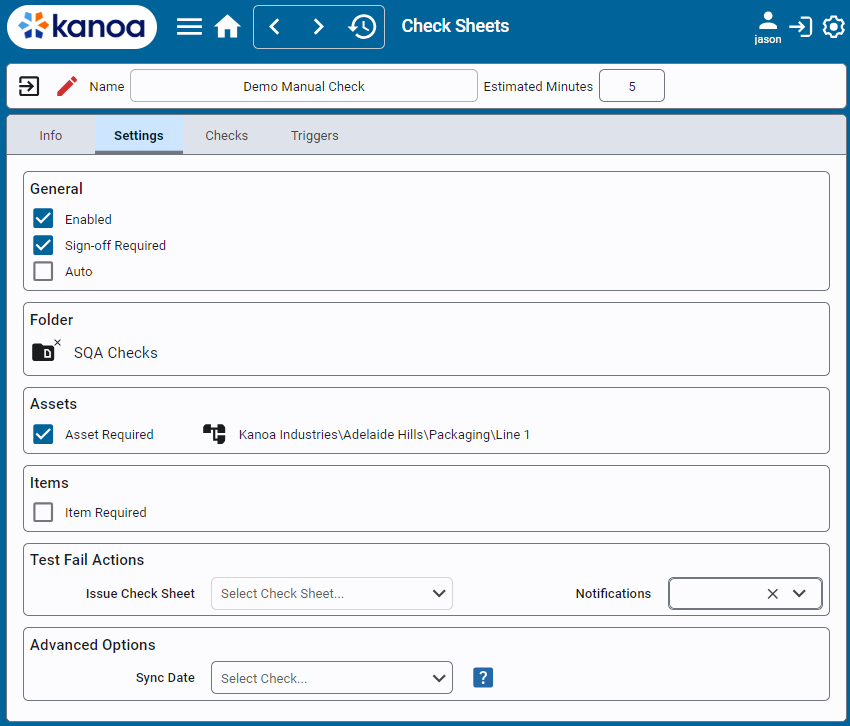
Settings
The settings tab allows you to change the check sheets behavior in the following way...
- Enabled: Enable or disable this Check Sheet
- Sign Off Required: If checked a manually taken check sheet will require the further step of being 'Approved' or 'Rejected' after being submitted. Automatically taken checks or manually taken checks that do not require 'sign off' will automatically move from Submitted' to 'Approved'.
- Auto: When enabled, indicates to the system that this check sheet should be automatically executed (tag values taken) whenever it is triggered. It is also used to filter Check Sheets in Analysis.
- Folder: Also known as Check Sheet Type. Provides a method of grouping check sheets together.
- Assets: Determines whether the check sheet is to be associated with an asset or set or assets
- Items: Determines whether the check sheet is to be associated with an item or item set or item class
- Test Fail Actions: Determines whether a re-test check sheet is scheduled should any check fail. Can also send alert notifications email on check failure.
- Advanced Options: Determines whether the date the check sheet is considered to be taken comes from a datetime check field or when the check is actually taken. Intent here is if the check goes against a product with a timestamp or the time a sample was pulled, not the time the data was entered into the system.
Adding Check Items
Check Item Groups
Check items are individual tests within a check sheet, and a check sheet is a collection of these items organized into groups. Use the Group buttons to organize your checks. nothing says you have to separate out checks, but you will need at least one group.
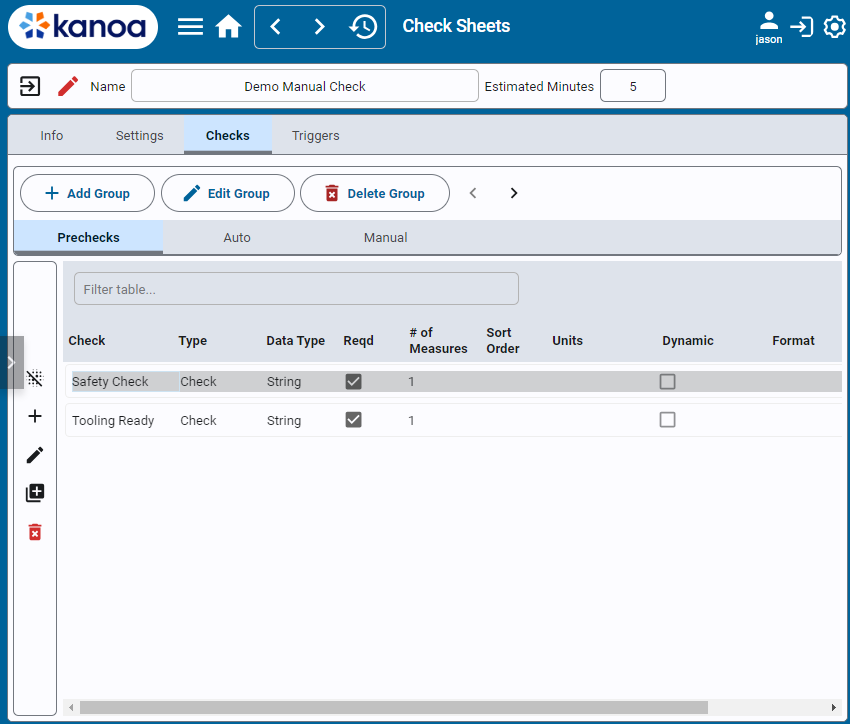
Checks
Double-click on a check item in the table to edit or click the + button to add a new check item.
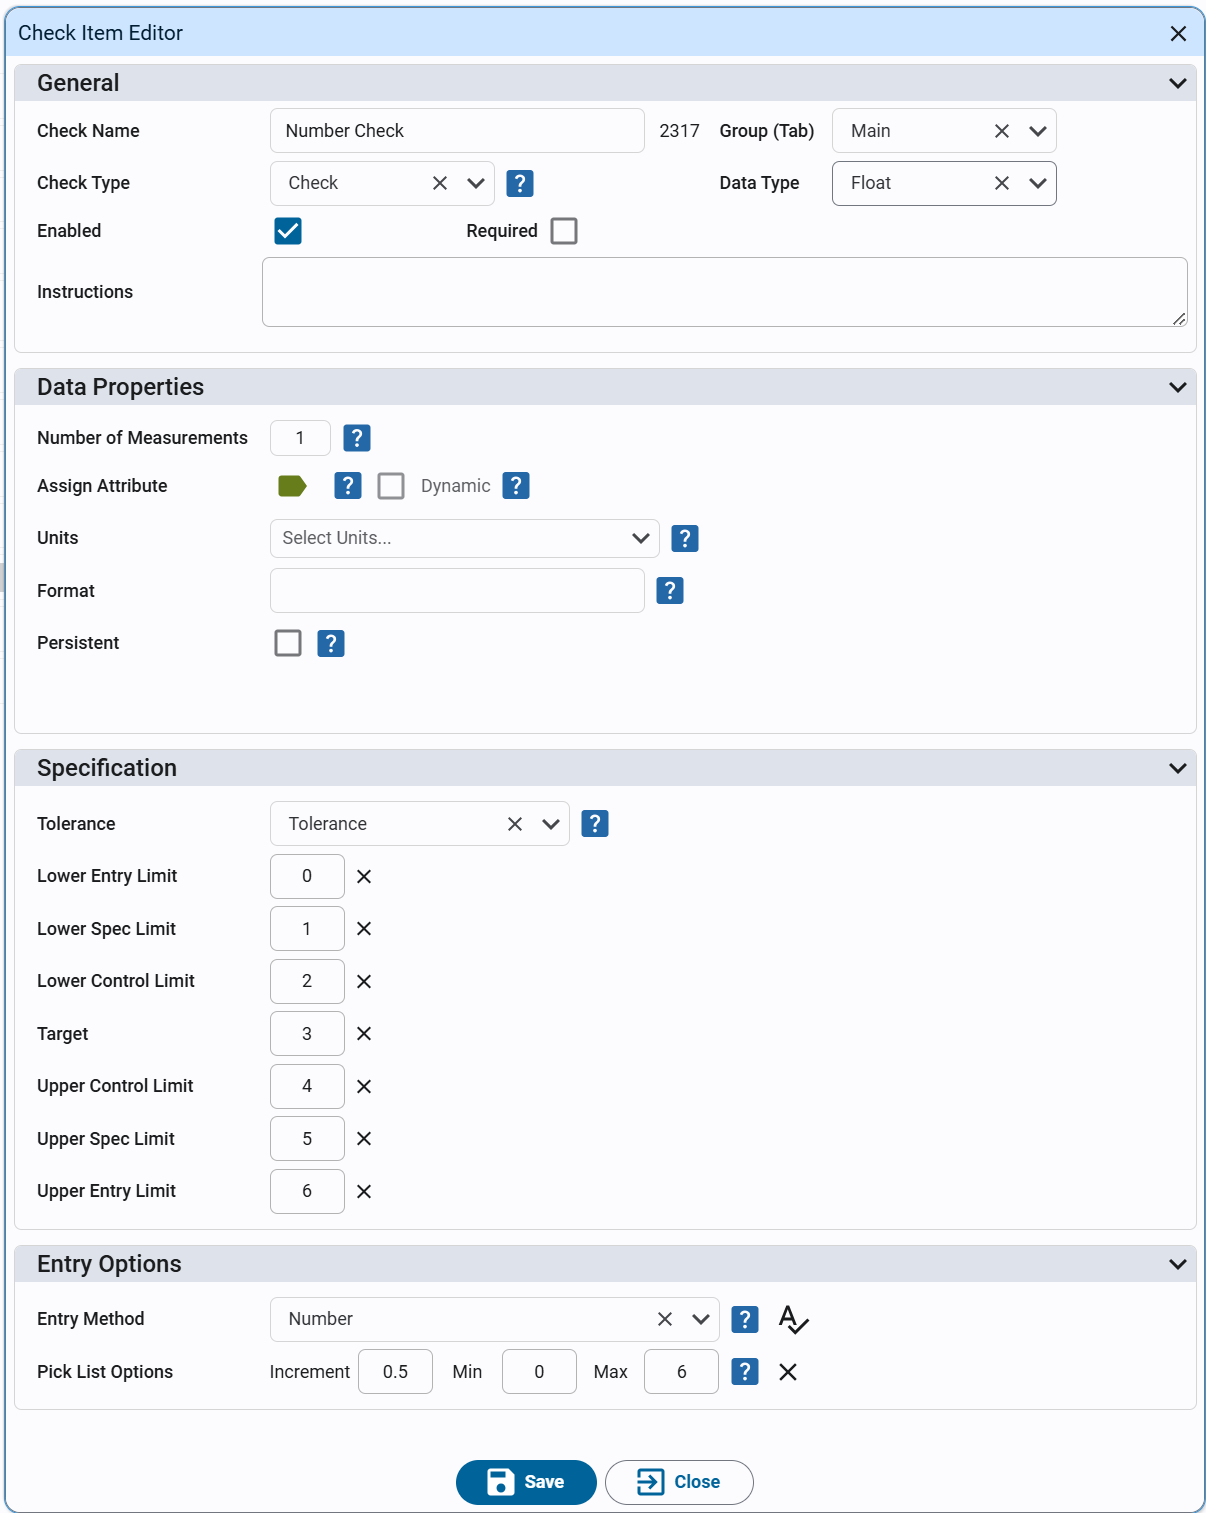
General
- Check Name: Give the check a name.The chkItemId is display to the right. This is only really of interest when debugging.
- Group: Select from a dropdown list of defined check groups.
- Enabled: Enable or disable the check. Disabled checks do not appear when users are entering checks against this check sheet.
- Required: Make the check mandatory for completing the check sheet.
- Data Type: Choose the data type for the value of this check (Boolean, Datetime, Float, Geo Location, Image, Integer, String)
- Check Type: Choose the type of check (Check, Calculation, Trigger). Further options are based on the type of check selected.
- Check is the standard type where one or more values will be stored.
- Calculation is where the check value will be calculated from one or more check item values.
- Trigger is to indicate that a value being entered against this check will trigger other check items to be evaluated
Data Options
- Number of Measurements: Set default number of measurements to be taken for this check. When set to more than 1, you can select the aggregate used to check against the specification set for this check. Default is 'Average'. (Check Type only)
- Instructions: Enter instructions about the checks for operators. (Check Type only)
- Assign Attribute: Attributes are used to associate a check with a tolerance spec and/or data source tag path. (Check Type only)
- Dynamic: When enabled, this check item will only be shown when a valid tolerance can be found for the associated attribute. Usage is to prevent displaying *checks that may not be valid for certain items (products/materials)
- Units: Define engineering units for data display. (Check Type only)
- Format: Enter a format string for data presentation. (Check Type only)
- Persistent: If enabled, previous check value taken for the check sheet/Asset/Item combo will be carried over to the next check sheet.
- Trigger: If trigger checks have been created, you can choose the trigger check that will trigger this check item to be evaluated. Evaluation means grabbing the value of any tag associated to this check item via attribute data source.(Check Type only)
Specification
- Tolerance: Only shown if check datatype is set to Float or Integer. Choices are 'Attribute Tolerance' (if check item is associated with an attribute), 'Tolerance', 'set Point' and 'Range'
- Entry Options: Select an entry method; options vary based on data type. (Check Type only)
Calculator
This section is only shown for checks of type 'Calculator'.
Choose between a formula (Average, Sum, Range, Min, Max, Standard Deviation), Eval to include other check item data points into a formula or Script to call custom python scripts from the Ignition Designer for check item calculation. Yuo can preview results to check your formula.
Custom scripts are created in the KANO_SCRIPTS project in the kanoaScripts/custom/quality/calculators script library. To create a custom script, create your function definition and add an entry to the kanoaScripts.custom.quality.calculators.getCalculators() function. paramsDict passed to the custom script function are args {'productId': 1, 'measurements': {}} where measurements is a list of check item values for the check item.
Adding Check Sheet Triggers
Triggers define when a check sheet should be scheduled. You don't need to create a trigger, a user can always manually add a new check to be taken but if you want checks to be performed on a recurring schedule (Time UInterval) or say at the beginning of a shift, or once a week, or whenever the product changeover, or always after maintenance or changeover has been completed, then add the necessary triggers.

Trigger Types
- Manual: Not entirely needed but if you want a check sheet that has been manually created to still honor delays and over due settings, then add a Manual trigger.
- Mode Change: Whenever an asset changes mode say from 'Idle' to 'Production' or 'Production' to 'Changeover', this type of trigger will automatically schedule a check sheet
- Product Change: Whenever the product changes on an asset, you can trigger this check sheet to be scheduled. Modifiers allow you to change the behavior in case you only want unique product to be check per shift.
- Re-Test: If this check sheet has ben set as the re-test when another check sheet fails you can define the delays for it.
- Shift Change: Whenever a shift change occurs, this type of trigger will automatically schedule a check sheet.
- Timed Interval: Schedule this check sheet every x minutes for all shifts or specified shifts when in certain modes or all modes.
Check Sheet State Timers
- Delay: When a trigger event dictates a check sheet to be scheduled, this value will delay it from being triggered. Use is say for a Shift Change to give the shift a chance to have a cup of tea before being inundated with checks to perform.
- Coming Due: How long a check sheet after being scheduled will remain 'Coming Due' before it becomes 'Due'.
- Over Due: How long a check sheet will remain 'Coming Due' before it becomes 'Over Due'.
- Grace: How long a check sheet will remain 'Over Due' before it becomes 'Missed'.