Inspect Incoming Material
When material arrives, many plants check it before it's used: who supplied it, which lot it is, when it expires, and what it looked like. Your Quality Manager decides whether your plant has a check like this and what it asks for. This lesson uses the Receiving Inspection, if it has been created: the Quality Manager track builds it in Build a Receiving Inspection. If your plant's check for incoming material has a different name or different fields, the steps are the same.
Add the Check for the Material
A check on a delivery is usually added by hand when the delivery arrives, rather than scheduled.
- Open Quality → Schedule → Active Checks and click Add Check.
- Choose the check sheet for incoming material.
- If Kanoa asks for an item, choose the material that arrived and click Add. Some check sheets offer only the items they apply to, such as raw materials.
- Open the new check.
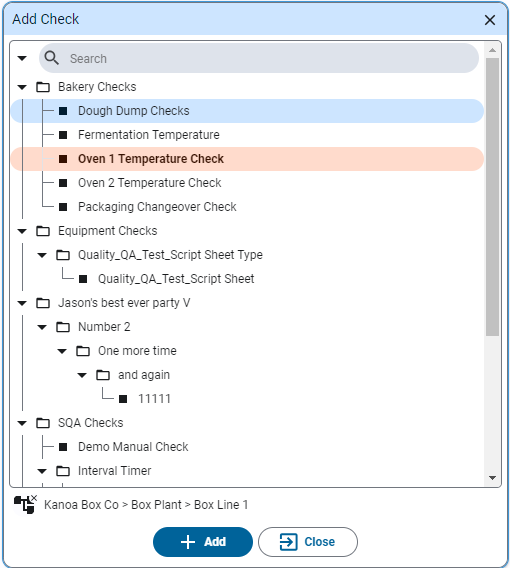
The item ties the check to the material, so every inspection of that material can be found later.
The check sheet offers only raw material items. You'd choose AL6061 for a delivery of aluminum bar.
Fill In the Fields
A check item can hold different kinds of value. These are the ones you're most likely to see on a check for incoming material:
| Kind of value | What you do |
|---|---|
| Pick list | Tap a button. Each choice can count as a pass, a warning or a fail, or be neutral: recorded but not judged, such as the supplier. |
| Text | Type it, such as a lot number from the label. Click the blue i icon on the check for its instructions. |
| Date | Pick a date, such as the expiration date. |
| Image | Add a photo, such as the label or a damaged pallet. On a desktop you browse for a file; on a mobile device you can use the camera. |
| Barcode | On a mobile device with a camera, scan the label instead of typing it. |
- Fill in each item.
- Submit the check.
If the check sheet doesn't need a sign-off, the check goes straight to Approved when you submit it. If it does, it waits as Submitted until a Quality Manager approves it.
The check asks for the Supplier (a neutral pick list), the Lot Number (text), the
Expiration Date and an optional Product Image. The lot number must be 6 to 20 characters in capitals, so a lot
number such as ab123 is refused. It doesn't need a sign-off.
Take a Photo on Mobile
A mobile device is often easier at the dock: you can take the photo and scan the label where the delivery is.
- Open Mobile Check Schedule and add the check for incoming material.
- Fill it in as above. For an image item, take a photo with the camera.
Reference Materials: Enter Check Data - How checks are entered on desktop and mobile.
Enter Check data
All check input fields will be displayed as defined by the check sheet. If Check Groups are used - they will display above the checks themselves. Check entry can be toggled between a Value Entry Popup window or keyboard input by clicking the
in the upper-right corner. There is also a selection for touch screen entry for devices with the ability.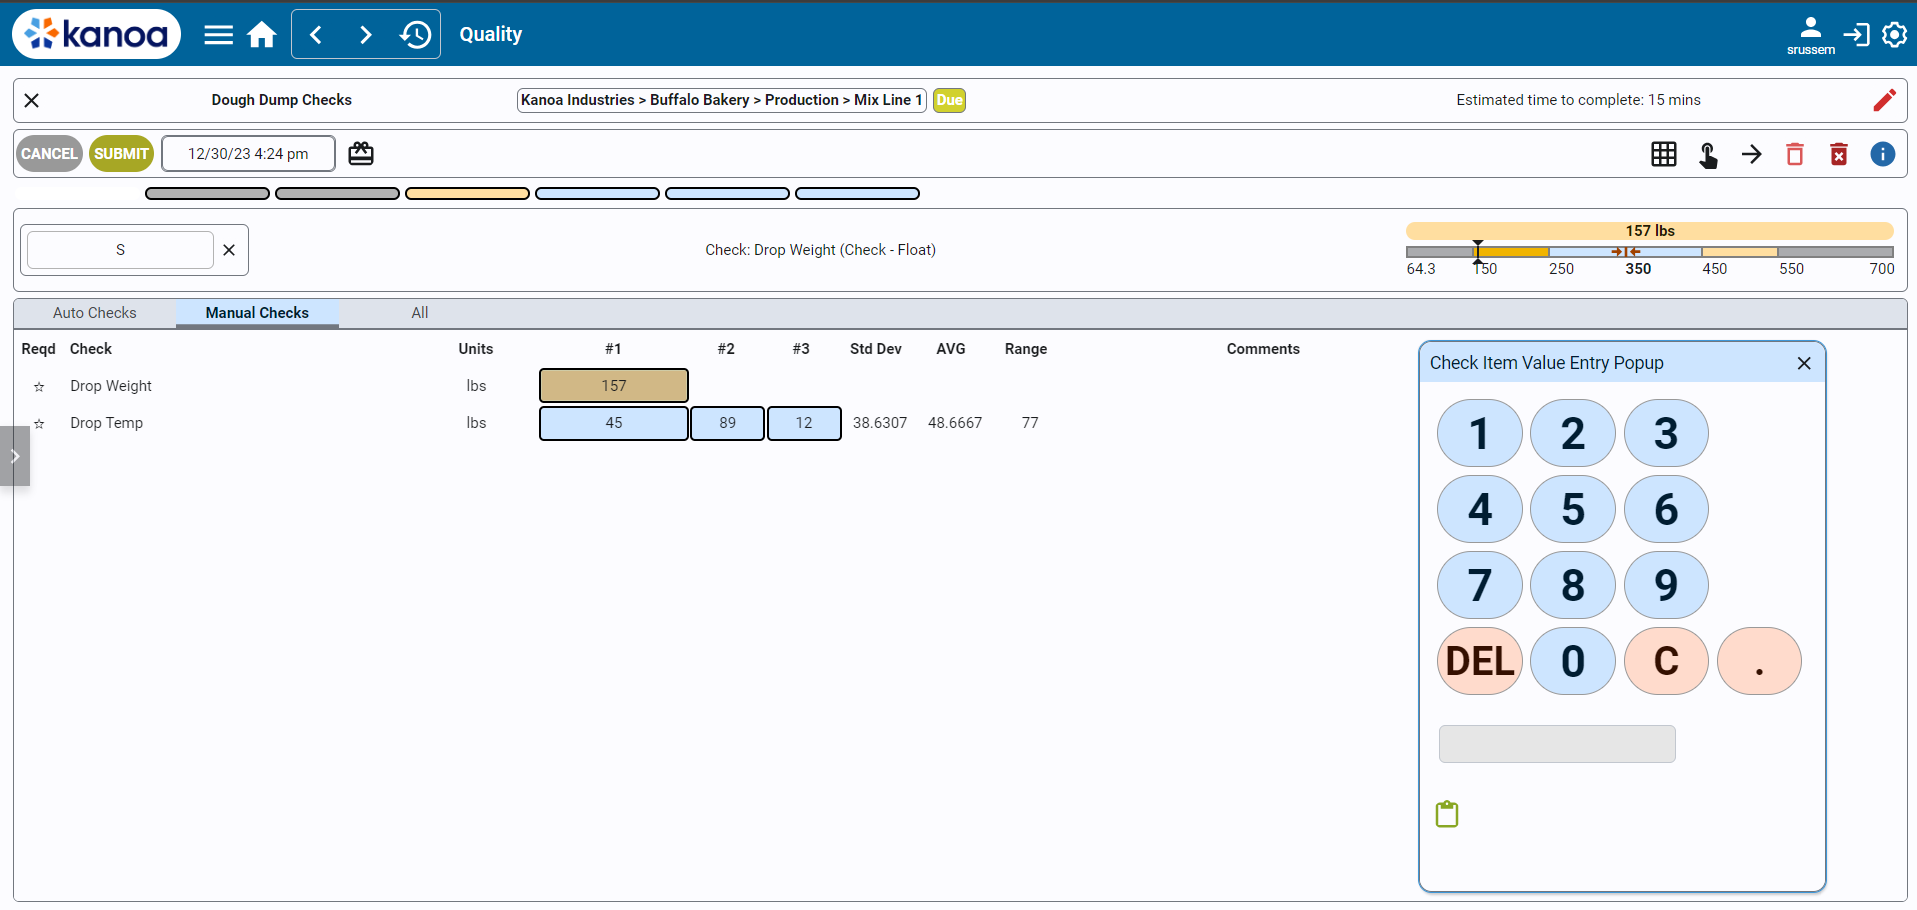
After a check has been entered, the next check is automatically selected; after the last check in a group, the selection stays on it rather than going back to the top. If there are multiple measurement counts, the direction in which the next check is selected can be changed by clicking the
icon . A check entry can be cleared by using the icon.If a pick list has been defined for a check item, pick list buttons are displayed for the user to enter the check value. If no picklist is defined for a numeric check, the numeric keypad is displayed. The numeric keypad can also be used instead of the picklist buttons by clicking .
A value outside a check's entry limits is refused with a message that gives the allowed range, and nothing is saved; enter a value within it. A value within the entry limits but outside the check's specification is saved and shown as failed.
Comments can be added for individual check items or a general comment for the check sheet can be added. If any check fails (as indicated by a red background), a comment will be required when the check sheet is submitted.
Above the Check Groups - to the right, the Spec Checks will be displayed with a graphical display of limits and actuals
A progress bar at the top tracks completion. Color coding indicates the status of each check (white/empty for incomplete, color-coded for complete with good/bad thresholds, gray for complete without thresholds).
Click the blue i icon and a dialog box will open with the information for each check as defined in the Check Sheet.
At any time during check entry, Check Sheet can be canceled. Once the checks are all entered, the check sheet can be submitted for approval and then accepted or rejected.
Checks can also be entered using your mobile device. On mobile, additional options include GPS tracking with a map view to record where checks were entered, as well as the ability to take photos or videos.
Controls
- Close Button: Located in the upper left, used to exit the check.
- Check Name: Displays the name of the check.
- Asset Information: Shows the assigned asset and current status of the check (e.g., due, coming due).
- Estimated Time to Complete: Indicates the time required to complete the check.
- Mode Indicator: Displays whether the check is in edit mode (for completing the check) or view mode (for reviewing entered data).
- Timestamp: Shows the current timestamp associated with the check.
- Edit Item Classes Button: For associating items to the check, if applicable.
- Toggle Keypad/Button Size: Switches between touchscreen and keyboard-friendly interfaces.
- Navigation Controls: Includes buttons for navigating between check entries and a clear button to reset check values.
- Information Button: Provides additional instructions for the check sheet.
Check Your Understanding
- Why does Kanoa ask for an item when you add a check for incoming material?
- What does a neutral choice on a pick list do?
- When does a submitted check go straight to Approved?
Answers
- The item ties the check to the material that arrived, so its inspections can be found later.
- It records the answer without passing or failing the check, such as the supplier's name.
- When its check sheet doesn't need a sign-off.