Build the Check Sheet
A check sheet is the reusable template for a check, like a blank form. Each question on the form is a check item. Nothing is recorded in this lesson; you're only building the form.
- Navigate to Configuration → Quality → Check Sheets.
- Click the add button and name the check sheet
Cleanliness Check. Click outside the field; Kanoa saves the sheet as soon as it has a name. - On the Settings tab, set the folder to
CoreForge\Safety, creating the folders with the folder button if they don't exist yet. Leave Asset Required, Item Required and Sign Off Required cleared.
Reference Materials: Check Sheet Settings
Check Sheet Settings

- Enabled: Enable or disable a check sheet.
- Sign Off Required: Require a sign off for approval. If unchecked a submitted check sheet is automatically moved to the 'Approved' Status Only approved checks ar eused in SPC analysis.
- Auto: Indicate that this check sheet only contains checks whose values will be automatically captured when the check sheet is triggered.
- Folder: Saves the check sheet in a specific folder.
- Asset Required: Determines if an asset must be selected for this check sheet.
- Item Required: Determine if an items must be selected for this check sheet.
- Issue Check Sheet: Choose a check sheet to schedule immediately upon test failure.
- Notifications: Select a team or user for email notifications on test failure.
- Sync Date: The 'Taken Date' of the Check Sheet by default is the date the check sheet is submitted. You can override this to force all check items and the check sheet itself to use the datetime picked for a check that is of datetime data type. This can be used when all check items are to be referenced to say the 'code time' printed on a product. To use this feature, simply create a check item that is of data type 'datetime' and then select it in this dropdown. When the user selects the date time, it will now be used for the 'Taken Time'.
- On the Checks tab, add a check item named
Machining Area: TypeCheck, Data TypeString, Enabled and Required selected. - Under Entry Options, choose
Textand add the responses:Cleanas Pass,Passableas Warning,Over-ClutteredandDirtyas Fail. - Save the check item.
- Use the duplicate button to copy
Machining Areathree times, and rename the copiesCoating Area,Mixing AreaandFinishing Area. - Confirm all four items have the same four responses.
The result category on each response is what makes the check pass or fail. A single Fail on a required item makes the whole check not OK. A Warning doesn't.
Reference Materials: Check Item Entry Options
Check Item Settings - Entry Options
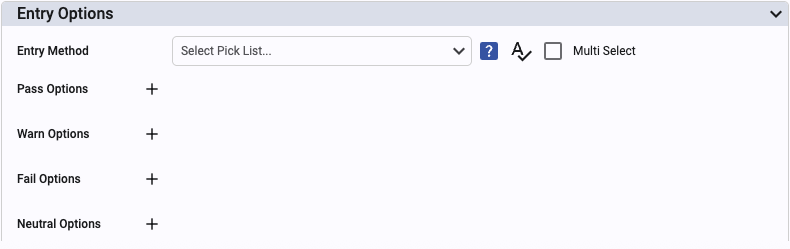
Entry Options allows you to present the user with a number of different ways to enter in a value for a check item. You don't need to provide an entry option, a standard text field or numeric input field will be prsented to the user and keyboard entry is always permitted (but validated).
The entry options that can be selected from vary based on the check item data type....
Boolean Data Type
- Boolean: Generates buttons based on values defined in the picklist values. Pick list values are in json format. 'TRUE' defines the button(s) that will yield a 1 result, 'FALSE' a 0. i.e.
{'TRUE':['Yes'], 'FALSE':['No']}
Integer and Float Data Types
- Number: Generates buttons from attribute tolerance if it exists otherwise uses values defined in the picklist values. Pick list values are in json format. 'denominator' defines the increment part (0.1 will generate 0.1, 1.2, .3 etc. ). 'lel' and 'uel' defines the lower and upper value range, 'ucl', 'lcl', 'lsl', 'usl' defines the spec limit. i.e.
{'denominator':0.5, 'lel':1,'lsl':1.1, 'lcl':1.8, 'tgt':2, 'ucl':2.2, 'usl':2.6, 'uel':3} - Time: Presents the user with a time key pad to enter duration in hours, minutes and seconds for a check. The value is stored in seconds i.e.
- Fraction: Generates buttons from attribute tolerance if it exists otherwise uses values defined in the picklist values. Pick list values are in json format. 'denominator' defines the increment part (0.1 will generate 0.1, 1.2, .3 etc. ). 'lel' and 'uel' defines the lower and upper value range, 'ucl', 'lcl', 'lsl', 'usl' defines the spec limit. i.e.
{'denominator':0.5, 'lel':1,'lsl':1.1, 'lcl':1.8, 'tgt':2, 'ucl':2.2, 'usl':2.6, 'uel':3}
String Data Type
- Tree: Generates a tree selector. Selection options are generated from a comma separated list. Each option must be wrapped in single quotes and use / to create the tree structure. i.e. 'Kanoa Industries/T1-Acme, TX','Kanoa Industries/T2-Acme, TX','Kanoa Enterprises/P1','Kanoa Enterprises/P1/Line 1','Kanoa Enterprises/P2/Line 2'. Do not have spaces between tree elements
- Text: Generates buttons with the text defined in the pick list values. Pick list values are in json format. i.e.
{'PASS':["Perfect", "Good"], 'WARNING':["Fair", "Average"], 'FAIL':["Bad"],'NEUTRAL':["Doesn't Matter"]} - Boolean: Generates buttons based on values defined in the picklist values. Pick list values are in json format. 'TRUE' defines the button(s) that will yield a 1 result, 'FALSE' a 0. i.e.
{'TRUE':['Yes'], 'FALSE':['No']} - Barcode Scanner: Provides a button that will uses a mobile devices camera to scan a barcode. Only valid for devices that have a built-in camera. A custom script can be selected to further parse the scanned in bar code. Refer to 'Creating custom scripts' for more info.
Trigger: If the check sheet has checks defined as triggers, you can choose a trigger check item that will cause this check to be taken. Used primarily to pull data from an external datasource such as a plc.
- Close the editor to return to the check sheet list. The new sheet's status is
Draft. - Change its status to
Released. - Open the sheet again and notice you can no longer change its items.
Operators can only run Released check sheets. Once a sheet is released, changes go through a new revision, so completed checks always point to the exact version that was used. You'll revise a sheet in the Receiving Inspection chapter.
Reference Materials: Check Sheet Version Control
Check Sheet Version Control
In the table, we can see that each check sheet has a status column.
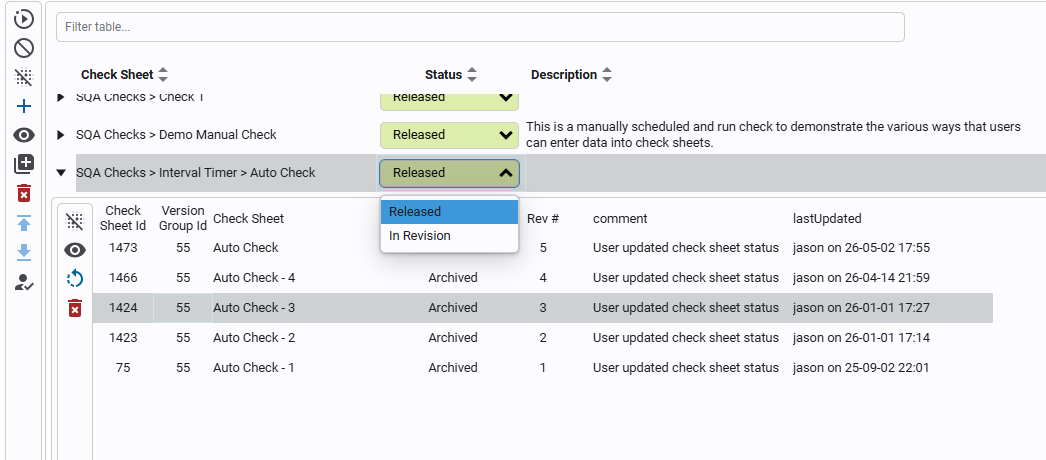
In order to make an edit to a check sheet, a user must change its status from 'Released' to 'In Revision'. When the user is done making their changes to the check sheet, they can then set the status back to 'Released'.
If the user clicks the arrow on the far left side of a check sheet's row, a history of the check sheet's previous versions will be displayed. Each version of a check sheet is from when the check sheet was last in a 'Released' state. Users may view each previous version of a check sheet, and also revert the current version back to a previous version. All versions of a check sheet are associated through a common master ID.
check-sheet-cleanliness-check.json: the finished Cleanliness Check, exported from the reference gateway, to compare with your build.