Complete on Desktop and Mobile
- Navigate to Quality → Schedule → Active Checks, click Add Check and choose
Receiving Inspection. - Kanoa asks for an item, and only shows
CoreForge\RMitems. ChooseAL6061and click Add. - Open the check and pick or type a supplier.
- Read the Lot Number instructions, then try
ab123. It's rejected. EnterLOT20260515instead. - Pick an expiration date. Leave Product Image blank or upload any image.
- Click Submit. With no sign-off required, the check is Approved.
- Install the Ignition Perspective app on a phone or tablet.
- Add your training gateway, open the Kanoa Mobile project and log in.
- Open the mobile check schedule, add a
Receiving Inspection, and complete it. - For Product Image, take a photo with the device camera.
The same check sheet works on desktop and mobile. On a desktop, Image items browse for a file; on mobile they can use the camera, which makes photo evidence practical on the plant floor.
Reference Materials: Enter Check Data
Enter Check data
All check input fields will be displayed as defined by the check sheet. If Check Groups are used - they will display above the checks themselves. Check entry can be toggled between a Value Entry Popup window or keyboard input by clicking the
in the upper-right corner. There is also a selection for touch screen entry for devices with the ability.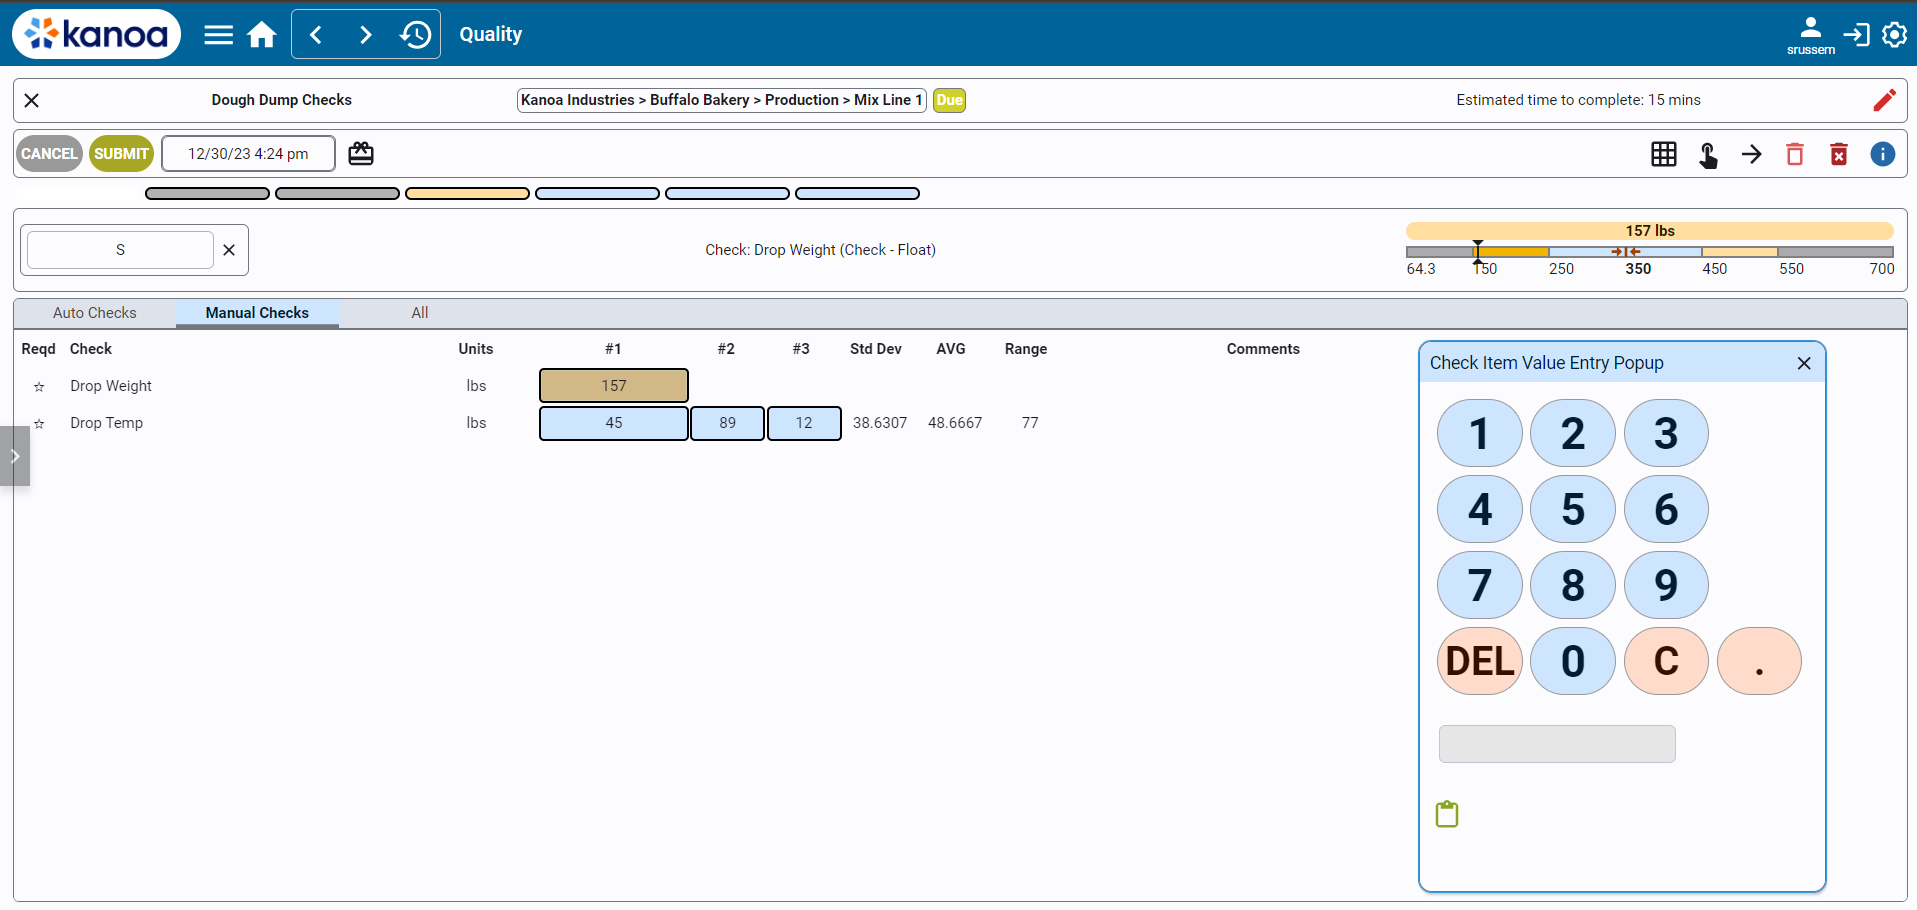
After a check has been entered, the next check is automatically selected. If there are multiple measurement counts, the direction in which the next check is selected can be changed by clicking the
icon . A check entry can be cleared by using the icon.If a pick list has been defined for a check item, pick list buttons are displayed for the user to enter the check value. If no picklist is defined for a numeric check, the numeric keypad is displayed. The numeric keypad can also be used instead of the picklist buttons by clicking .
Comments can be added for individual check items or a general comment for the check sheet can be added. If any check fails (as indicated by a red background), a comment will be required when the check sheet is submitted.
Above the Check Groups - to the right, the Spec Checks will be displayed with a graphical display of limits and actuals
A progress bar at the top tracks completion. Color coding indicates the status of each check (white/empty for incomplete, color-coded for complete with good/bad thresholds, gray for complete without thresholds).
Click the blue i icon and a dialog box will open with the information for each check as defined in the Check Sheet.
At any time during check entry, Check Sheet can be canceled. Once the checks are all entered, the check sheet can be submitted for approval and then accepted or rejected.
Checks can also be entered using your mobile device. On mobile, additional options include GPS tracking with a map view to record where checks were entered, as well as the ability to take photos or videos.
Controls
- Close Button: Located in the upper left, used to exit the check.
- Check Name: Displays the name of the check.
- Asset Information: Shows the assigned asset and current status of the check (e.g., due, coming due).
- Estimated Time to Complete: Indicates the time required to complete the check.
- Mode Indicator: Displays whether the check is in edit mode (for completing the check) or view mode (for reviewing entered data).
- Timestamp: Shows the current timestamp associated with the check.
- Edit Item Classes Button: For associating items to the check, if applicable.
- Toggle Keypad/Button Size: Switches between touchscreen and keyboard-friendly interfaces.
- Navigation Controls: Includes buttons for navigating between check entries and a clear button to reset check values.
- Information Button: Provides additional instructions for the check sheet.