Navigation
The menu on the left is the way your users reach every screen. This lesson shows you how to add an item to it, choose which roles see it, and hide one you don't need.
Open the Navigation Editor
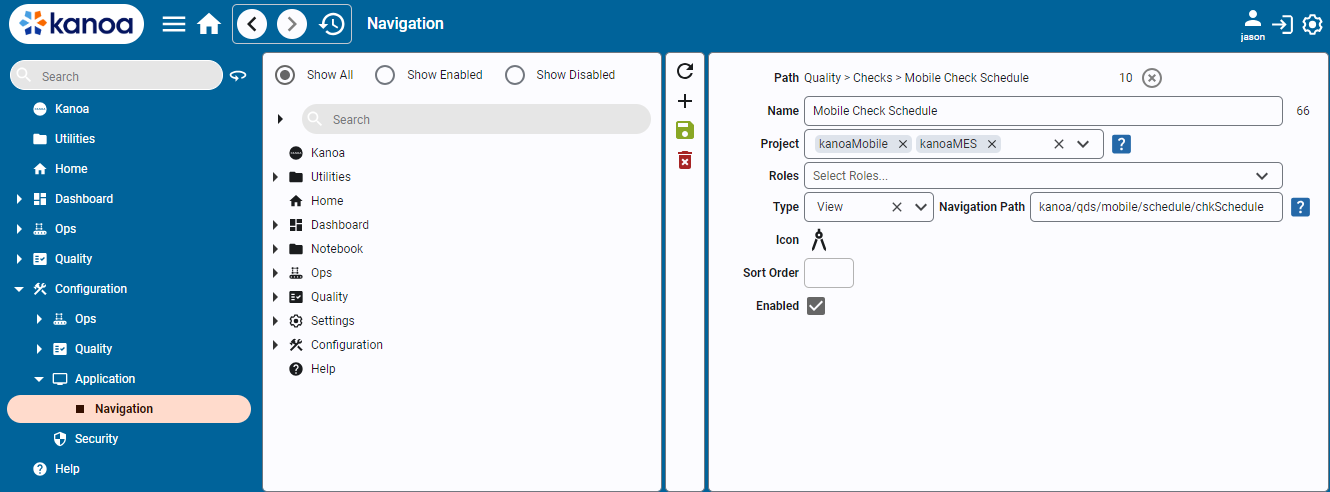
Open Configuration → Application → Navigation. The menu appears as a tree.
Add a Menu Item
- Select the item to add under, or select nothing to add at the top level.
- Click the add button.
- Enter a Name. It's what shows in the menu.
- Set Type to a URL, and enter the web address.
- Choose an Icon if you want one, and set the Sort Order.
- Click save before you make any other change.
For example, add a link named Kanoa Web Site that opens https://kanoa.ai.
Type can also link to a view or page built in the Designer. Building that page is Developer Training. If your developer has built one, you can link it here.
Choose Who Sees an Item
- Roles: add roles to show the item only to users with at least one of them. With none, everyone sees it.
- Project: pick the projects the item appears in. Leave it blank for all projects.
- Enabled: untick it to hide the item without deleting it.
Gateway Admins always see every item.
The menu is shared. Hiding or deleting an item removes it for every user in the project. Rearrange items by dragging them in the tree. To remove one for good, select it and use the delete button.
Reference Materials: Navigation - The fields of a navigation item.
The navigation options available to a user can be modified through the application in the navigation configuration screen. This provides the ability to weave your custom screens in alongside the provided kanoa screens, to create a seamless application.
To create a new navigation item under an existing one, click anywhere in the navigation tree and select the  button.
To create a new item at the root level, add it the same way, then clear its parent with the ⊗ next to Path and save it.
- Path: Informational. Displays the path and parentId. The parent can be cleared to place the navigation item at the root.
- Name: Add a name for the menu item that will be shown in the navigation tree.
- Project: Specify one or more runnable projects for which the item will appear. Leave blank to make it available to all projects.
- Roles: Add specific user roles required for the menu item to be visible.
- Type: Link the item to a view or page created in the Designer, or to a URL.
- Icon: Add a custom icon for this item.
- Sort Order: Define the order in which the item appears in the tree.
- Enabled: Enable or disable the item to show or hide it from the navigation.
Click the  to save your changes before doing any other edits.
Click the  to delete a navigation item.
Navigation items can be rearranged by dragging them to different positions in the tree.
Check Your Understanding
- How do you show a menu item only to supervisors?
- How do you hide an item without deleting it?
- A new link doesn't appear after you add it. What did you probably forget?
Answers
- Add the Supervisor role in Roles.
- Untick Enabled.
- Saving it. The item must be saved before you make other edits.