Change Over
A changeover is the time between the last good part of one product and the first good part of the next. Kanoa counts it as its own mode, Changeover, so the time isn't held against either run, and so your plant can see how long changeovers really take.
Put the Machine into Changeover
- Tap the Production card to open Run Control.
- Change the mode to Changeover, and close Run Control.
The Production card now shows Changeover. The run you were on has ended.
Swap the Tool
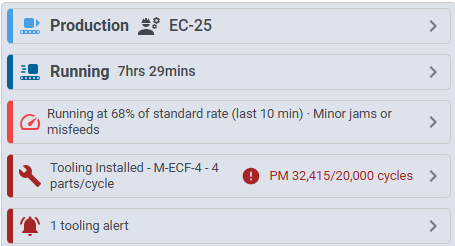
Skip this section if your machine doesn't use molds or dies. On machines that do, a Tooling card on the info panel shows the tool that's mounted, such as Tooling Installed - M-100 - 4 parts/cycle. Kanoa measures the run against the mounted tool's rate, so the tool in Kanoa has to match the one in the machine.
- Tap the Tooling card. The Tooling popup opens on its Mount / Unmount tab.
- Select the mounted tool, and unmount it.
- Under Mount a tool, pick the new tool as the Tool, and leave Into as On the machine.
- Leave Mounted at empty, so the tool is mounted now, and click Mount.
- Close the popup. The Tooling card shows the new tool.
If you mount a tool before putting the machine into Changeover, Kanoa asks whether to switch to Changeover first. Say yes: setting a tool is changeover time, not production.
If the tool is due for maintenance or over a limit, a Mount warnings popup opens. Don't just click OK: tell your supervisor or maintenance first. OK mounts the tool anyway and saves the warning with the mount. Close mounts nothing.
The Tooling card's stripe is green while the tool is within its limits, orange when it's due for maintenance, and red when it's over a limit.
Reference Materials: Mounting Tools - The mount panel, mount rules and warnings.
A tool is mounted on a machine from the Operator Station: the info panel's Tooling card shows the installed tool, and tapping it opens the Tooling popup. Its Mount / Unmount tab is the mount panel. A machine's PLC can also mount tools through its tags (see Tooling Tags).
For users with the Configure Assets security function, the popup also has a Tool Config tab with the installed tool's editor, or a Tools tab with the tools list when no tool is installed.
The Mount Panel
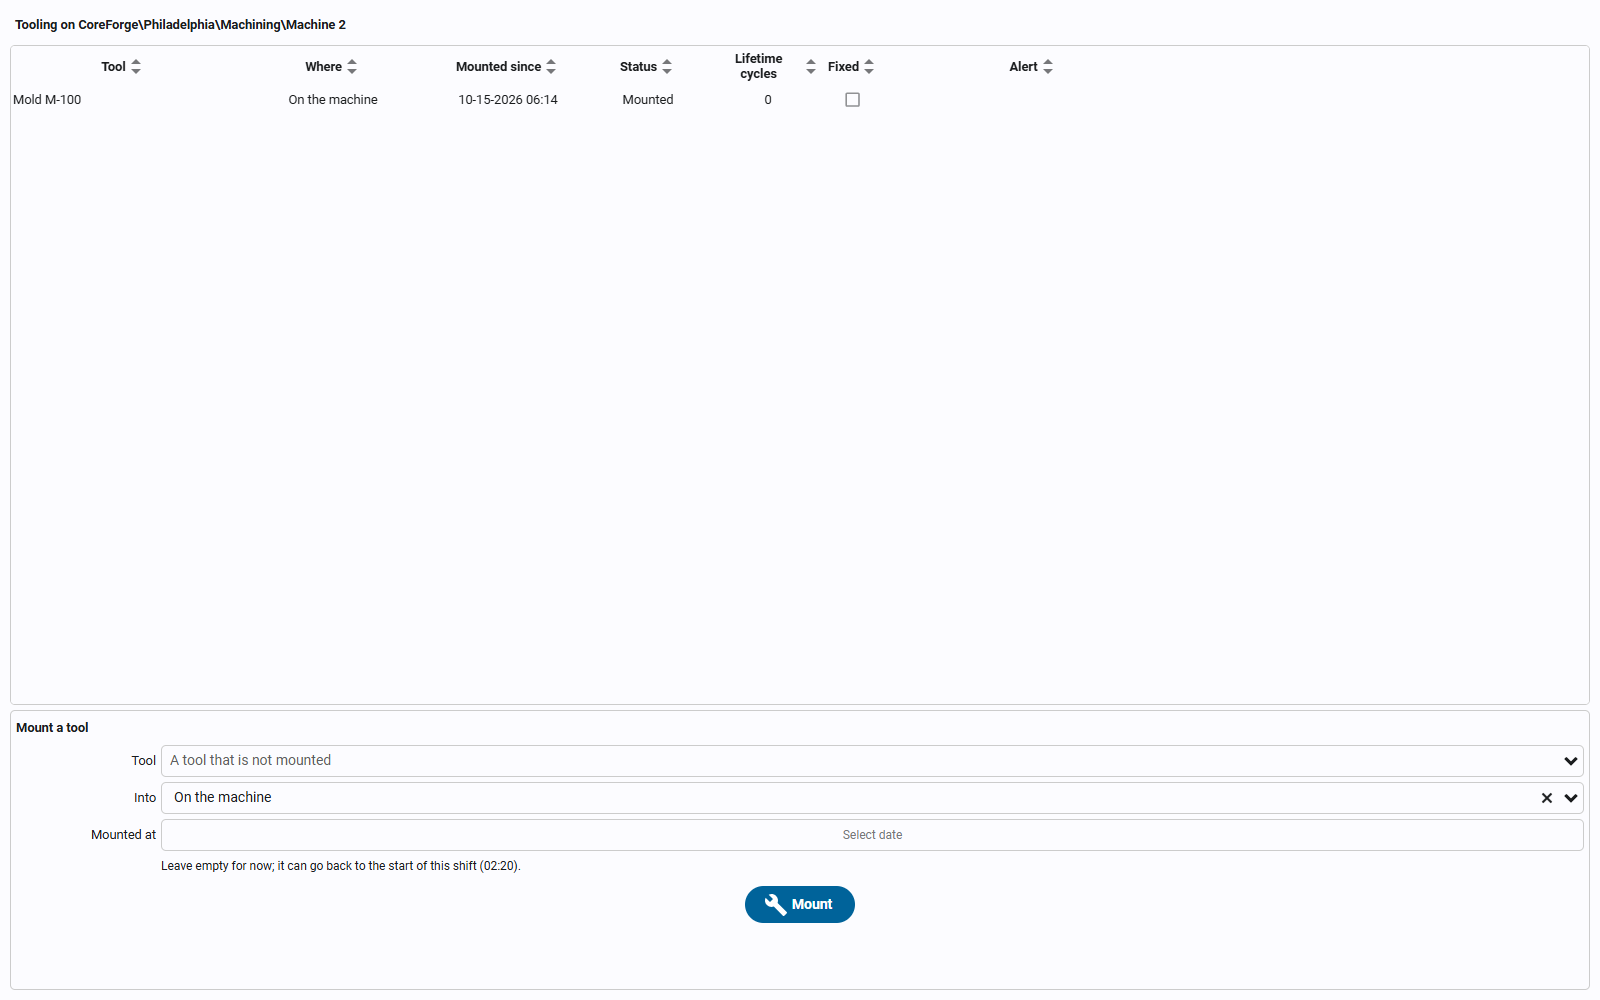
The mount panel lists the tools on the machine: where each is (on the machine, or in a pocket of another tool), when it was mounted, its status, lifetime cycles, whether it's fixed, and any alert.
To mount a tool:
- Pick the Tool. Only the tools that can go on this machine are listed: those in its site that aren't mounted anywhere, and tools outside any site.
- Pick Into: On the machine, or a free pocket of a tool already mounted (to put an insert into a mold base).
- Leave Mounted at empty for now, or back-date it to when the tool really went on. It can go back to the start of the current shift.
- Click Mount.
Select a mounted tool to unmount it (with or without its inserts), to fix an insert in its pocket so it comes off with the base, or to block and unblock its positions.
The Tooling nav item on the Operator Station also opens the mount panel. It's off by default; turn it on in the asset operation navigation settings.
Rules
- A machine can have one tool with output positions at a time. A mold base's inserts count as part of it.
- A tool is mounted on one machine, or in one pocket, at a time. Unmount it first to move it.
- A tool is mounted only on the machines in its site (a tool outside any site can go anywhere).
- A tool with fit rules is mounted only where one of them allows (an insert in a mold base, only in a base its rules allow).
- A mount can't start in the future, or overlap the tool's earlier mounts.
- A tool that is In repair, Damaged or Retired can't be mounted.
Warnings
Mounting a tool that is over a limit shows a Mount warnings popup. OK mounts it anyway, and the accepted warnings are saved in the mount's note; Close mounts nothing.
A site can add its own mount check, a project script function named in the configuration values
toolingValidationProject and toolingValidationFunction. It's given the proposed mount, including the tool's positions,
and returns errors, which refuse the mount, and warnings, which need accepting. A check that fails or takes longer than
10 seconds becomes a warning, so it can't stop production.
Runs and History
- Mounting, unmounting or swapping a tool starts a new run at that moment when it changes the rate (see Cycle Rates and Item Rates). A swap from a tag unmounts and mounts at the same moment, so the run there gets the new tool's rate.
- A back-dated mount re-stamps the runs since then with the tool's rate and moves the cycles the machine ran since then onto the tool's life counts.
- A mount window can be corrected from the tool's History tab (a new start or end, with a reason). Runs are split at the corrected edges where the rate changes.
Start the Next Run
When the machine is set up, start the next run from Run Control, as in Run Production: pick the next order on the Orders tab, or the product on the Product tab, and click Start Run. The changeover ends when the run starts.
Check Your Understanding
- Why does Kanoa count changeover as its own mode?
- You've mounted a new mold and a Mount warnings popup opens. What do you do?
Answers
- So changeover time isn't held against either run, and the plant can see how long changeovers take.
- Don't click OK straight away: tell your supervisor or maintenance about the warning first.